Hottie Cover Pattern/Guidelines
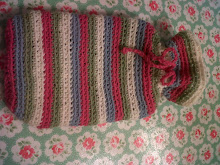
 I know you didn't think I was coming back? Of course I promised you some guidance and here I am. Thank you so very much for all your kind words on my Quick and Easy Stripey Hottie Cover. I was away for three days but received all your lovely comments on my BlackBerry and couldn't wait to get back to hopefully guide some of you ladies! Firstly, you must look through your crochet hook collection and find yourself a 4mm hook.
 After you have selected chosen hook, you are going to pour yourself a nice cuppa. Then you will take your hook and chain around your hot water bottle. That's all I did. I added a few extra stitches to facilitate the hottie being full of water (it was obviously empty when I was measuring). But the yarn will stretch. I actually started with 46 stitches for my size bottle, which I am assuming is a standard size hottie (18cm x 40cm). After you have chained your needed amount of stitches, you will join it in the round. Your objective here is to create a tube. This way there is not any seams to sew up later.
 You will continue to single crochet for two rows in your chosen colour. You will change colours every TWO rows. I used the Cascade 220, which we all know is the yarn left over from my Never Ending Ripple Blanket. I also crocheted THROUGH THE BACK LOOP. This is what creates this particular pattern. You can crochet through the front loop, crochet through the back loop or crochet through both loops. All produce different patterns and textures. Please refer to my link to be sure you are placing hook through this loop.
~~~~~~~~~~~~~~~~~~~~~~~~~~~~~~~~~
When you have crocheted the length of your hottie you will finish, tie off and weave in all your seams. Now to close in the bottom of your funny looking tube. All I did was turn it inside out and crocheted the two sides together. I hate sewing up but I am sure you could do that as well! There is no shaping (decreasing or increasing) in this pattern. Then, for the neck, I chained 100 stitches to make the tie. I did this in a contrasting colour from where I weaved in the tie. The stitches are loose enough to weave in tie without altering the pattern at all. Tighten the bow and Bob's your uncle!
~~~~~~~~~~~~~~~~~~~~~~~~~~~~~~~~~~~~~~~~
